Hardwood floors are a beautiful and durable choice for any home, but even the sturdiest wood can experience damage over time. From scratches and dents to water damage or warping, issues can arise that affect individual planks rather than the entire floor. In many cases, homeowners don’t need to replace the entire floor, replacing individual planks can restore both the look and functionality of the space. We at Mikes Custom Flooring would like to discuss the basics of understanding individual planks replacement.
Why Replace Individual Planks?
Replacing only the damaged planks is often more cost-effective and less disruptive than full-floor replacement. It allows you to maintain the integrity of the surrounding floor while addressing the problem directly. Common reasons for plank replacement include water damage, pet scratches, heavy furniture marks, and localized warping or cupping. By focusing on the damaged area, you can preserve your floor’s aesthetics and avoid unnecessary expense.
Tools & Materials You’ll Need
To replace a single hardwood plank, you’ll need a few basic tools and materials. Essential items include a pry bar, hammer, circular saw or oscillating multi-tool, wood glue, and a matching replacement plank. If the floor is finished, you may also need sandpaper and stain or finish to blend the new plank with the existing floor. Selecting the correct plank species, grade, and finish is crucial for a seamless repair.
Step-by-Step Replacement Process
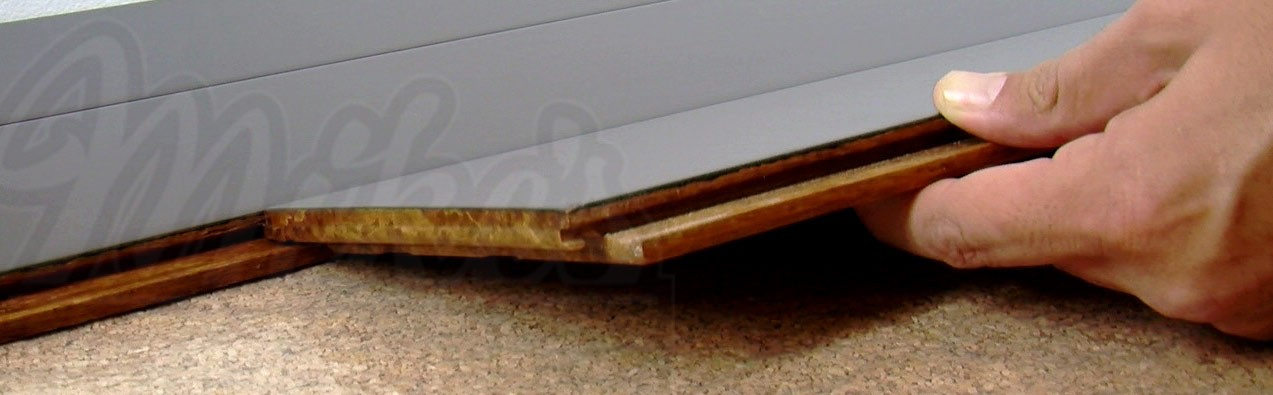
1) Identify the Damaged Plank: Begin by carefully examining your floor and marking the plank(s) that need replacement. Ensure that you only remove the damaged sections.
2) Remove the Old Plank: Using a circular saw or multi-tool, make cuts along the plank’s length and width. Be careful not to damage neighboring planks. Pry out the damaged piece using a pry bar.
3) Prepare the Area: Clean the gap, removing any nails, debris, or glue. Make sure the subfloor is smooth and level to ensure a proper fit for the replacement plank.
4) Install the New Plank: Apply wood glue to the edges of the replacement plank and gently tap it into place. Use a mallet if needed to ensure a tight fit.
5) Finishing Touches: Once the plank is securely in place, sand lightly to level it with the surrounding floor. Apply matching stain or finish to blend the repair seamlessly. Allow adequate drying time before walking on the area.
Tips for a Professional-Looking Repair
1) Match the Grain and Color: Take a spare plank from an unused area if possible, or purchase a plank from the same batch to ensure color consistency.
2) Work Slowly: Precision is key. Take your time when cutting and fitting the plank to avoid additional damage.
3) Seek Help if Needed: If you’re unsure or dealing with intricate patterns like herringbone or parquet, hiring a professional may be the best choice.
Hardwood Floor Installation, Repairs, Refinishing & More in Charles Town & Eastern Panhandle of Berkeley & Jefferson Counties in WV | Winchester & Frederick County | Round Hill & Loudoun County | Berryville & Clarke County | Herndon & Fairfax County VA
Replacing individual hardwood floor planks is a practical solution for localized damage. With careful planning, the right tools, and attention to detail, homeowners can restore the beauty and function of their floors without the cost and disruption of a full replacement. Properly executed, a plank replacement can be virtually invisible, keeping your hardwood floors looking as good as new for years to come. Call Mike’s Custom Flooring when you need hardwood flooring services.